Running and Debugging
This section describes how to run and debug the ZEN-garden module for developers. This section requires that ZEN-Garden repository is forked as described in (see Installation for Developers). When the repository is forked, the code from the fork will be used to execute the module whenever ZEN-garden is called on the command line or imported in a python script.
This section assumes the user already has a model which they would like to run and is familiar with the the general instructions for building a model and running a model <running.running>.
Run ZEN-garden as a Developer
For developers, ZEN-garden can be run in the same way as for model users. Please refer to to the user guide on running ZEN-garden for details.
Warning
When running ZEN-Garden as a developer, always make sure that the python environment is up to date with the current model version. This means that the ZEN-garden environment should be re-installed each time you pull a new version from the repository. Otherwise, dependency changes may result in errors.
Tip
The command-line command zen-garden is a shortcut that invokes the
run function from zen_garden. This shortcut is
defined in the [project.scripts] section of the pyproject.toml.
Debugging ZEN-garden
This section describes options for debugging ZEN-garden. Debugging is essential for developing and testing the model codebase. Unfortunately, debugging ZEN-garden is perhaps unintuitive at first. ZEN-garden is typically run from the command line while debugging is usually done with an integrated development environment (IDE) such as PyCharm or VSCode.
Debug ZEN-garden using a Python Script
The (perhaps easiest) way of debugging ZEN-garden is to write a python script from which to execute model runs. This method of running ZEN-garden is described in detail in the additional remarks section for running model. In short, ZEN-garden can be run from a python script using the following code:
from zen_garden import run
import os

os.chdir("<path\to\data>")
run(dataset = "<dataset_name>")
Using a IDE, this python code can be run and debugged using the standard debug
functionalities of the IDE. Any breakpoints set within the ZEN-garden module
will be stopped at when the script is run in debug mode. As described in the
additional remarks section for running model,
all command line flags for ZEN-garden can be directly added into the
run function of ZEN-garden.
Debug using IDE-specific Configurations
Alternatively, developers may also debug ZEN-garden using IDE-specific
debug routines and configurations. These configurations are described
below for two common IDEs: PyCharm and VSCode. In both cases, the user
must specify special debug settings in the IDE. These settings essentially
inform the IDE about which command line script (i.e., zen-garden)
needs to be run whenever debugging. Once set up, the user can debug ZEN-garden by
clicking on a button in the IDE. The full ZEN-garden module will then be run
in debug mode, regardless of which file is currently open and being edited. The
main advantage of this method over the previous one is that users no longer need
to flip back and forth between the file they are editing and a script for
running ZEN-garden.
PyCharm configurations
To set-up easy running and debugging with the PyCharm IDE you can use the configuration setup. This can be found next to the run button. Click on “Edit configurations..” to edit or add a configuration.
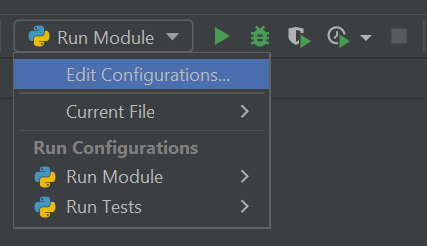
Add a new configuration by clicking on the “+” button on the top left corner of
the window. Choose Python as a type. You can name the configuration however
you like. The important settings are:
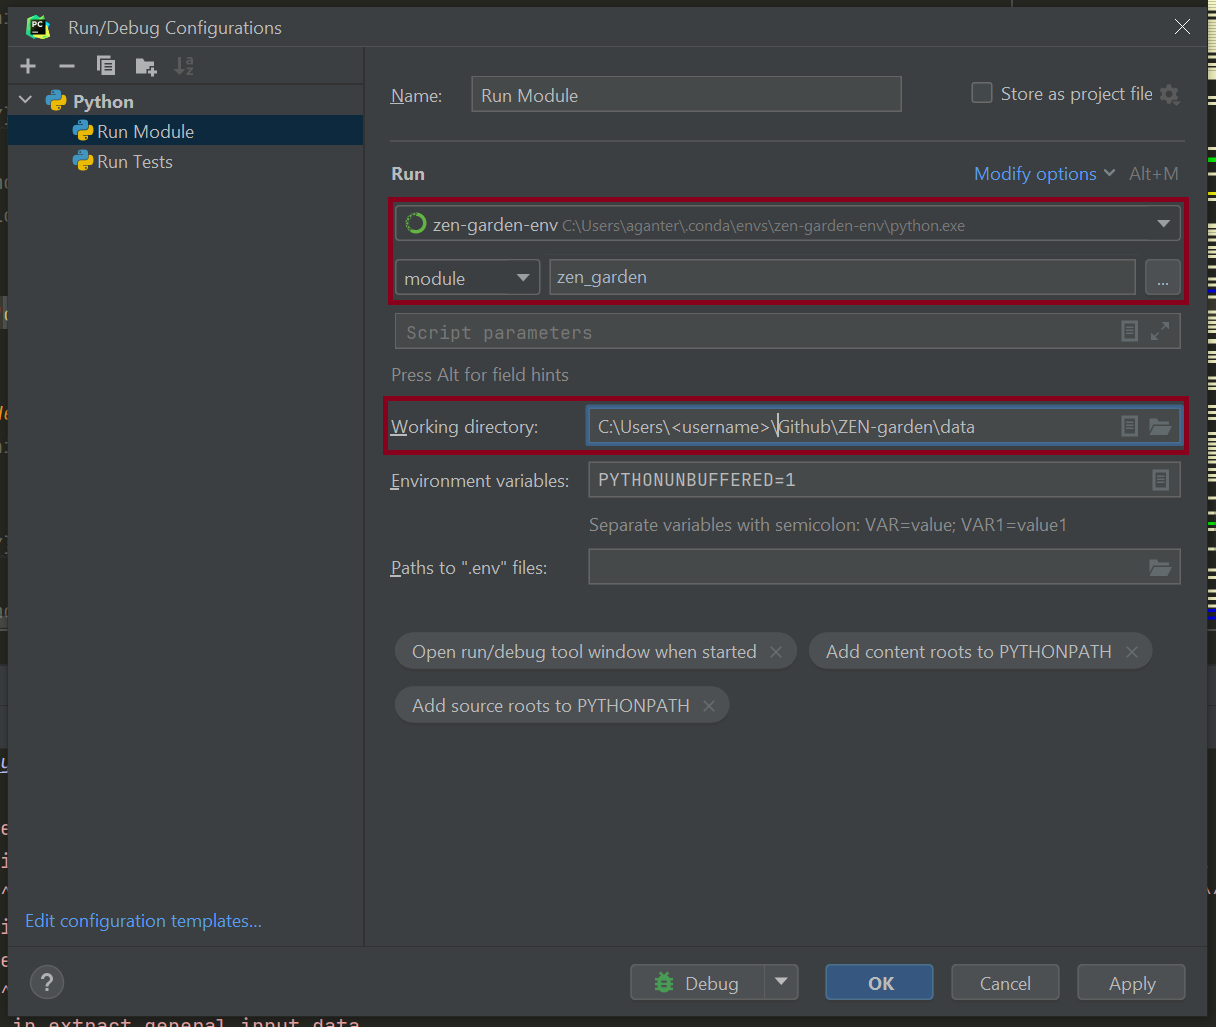
Change “Script Path” to “Module name” and set it to “zen_garden”
Set the Python interpreter to the ZEN-garden anaconda environment. Per default, the environment will be called
zen-garden-env. Important: This setup will only work for Conda environments that were also declared as such in PyCharm; to set the path to the Python executable, you will have to create a new PyCharm interpreter first.Set the “Working directory” to the path that contains the
config.json. This directory will also be used to save the results.
In the end, your configuration to run ZEN-garden as a module should look similar to this:
Once these configurations are set, the standard run and debug buttons of
the PyCharm IDE can be used. When pressed, these buttons will create and execute
the appropriate terminal commands for running and debugging ZEN-Garden,
respectively. Command line flags can be typed into the Script Parameters
field of the Run/Debug configurations.
VS code configurations
To debug ZEN-garden with VSCode, follow these steps:
select the correct interpreter: Press ctrl + shift + p to open the command palette (if you’re on Windows or Linux), and enter
Python: Select interpreterand make sure that the correct conda environment is selected. Per default, the conda environment will be calledzen-garden-env.Create a new file in the folder
./.vscode/calledlaunch.jsonwith the following content:{ "version": "0.2.0", "configurations": [ { "name": "Python: ZEN-Garden", "type": "debugpy", "cwd":"<path to folder with dataset>", "request": "launch", "module": "zen_garden", "console": "integratedTerminal" } ] }
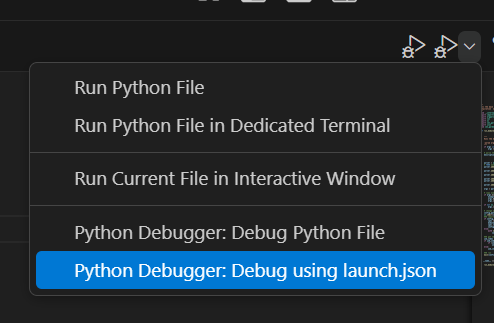
To debug ZEN-Garden, select Python Debugger: Debug using launch.json from
the debug menu as shown in the figure. Note that no command line flags can be
entered. The dataset must therefore be specified in the config.json file which
is located in the dataset folder.